In such setups, correct configuration is especially important, as manufacturers cannot anticipate which third-party device their products will be connected to. Therefore, it is up to the installer to ensure proper coordination.
Here is the top view of the battery:

Among the available ports, connect an RJ45 plug to the CAN IN port and then connect the other end to the PCS port on the inverter.
The battery comes with several factory cables — one of them is labeled “Inverter–Battery.”
Use this cable. Pins 4 and 5 are connected on both ends in the same order.
Additionally, the battery features a DIP switch, shown as part (4) in the diagram above.
The DIP switch looks as follows:
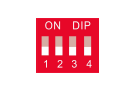
For Deye inverters, the correct setting is 0010 (down–down–up–down).
⚠️ If you need to change the DIP switch position, you must turn off the battery first, including using the breaker switch (marked as part 3).
After completing these settings, no further configuration is required on the battery.
It will work perfectly without Wi-Fi, and you can monitor its data through the inverter.
On the inverter side, under the battery settings, select Lithium battery, and use the same Lithium mode (0/00) as for the original Deye battery.